3Di Management overview
To use 3Di Management, open your browser and go to https://management.3di.live and log in with your username and password. If you do not have a 3Di account yet, or do not know your username and password, please contact the Service desk.
After logging in to 3Di Management, there are several possibilities:
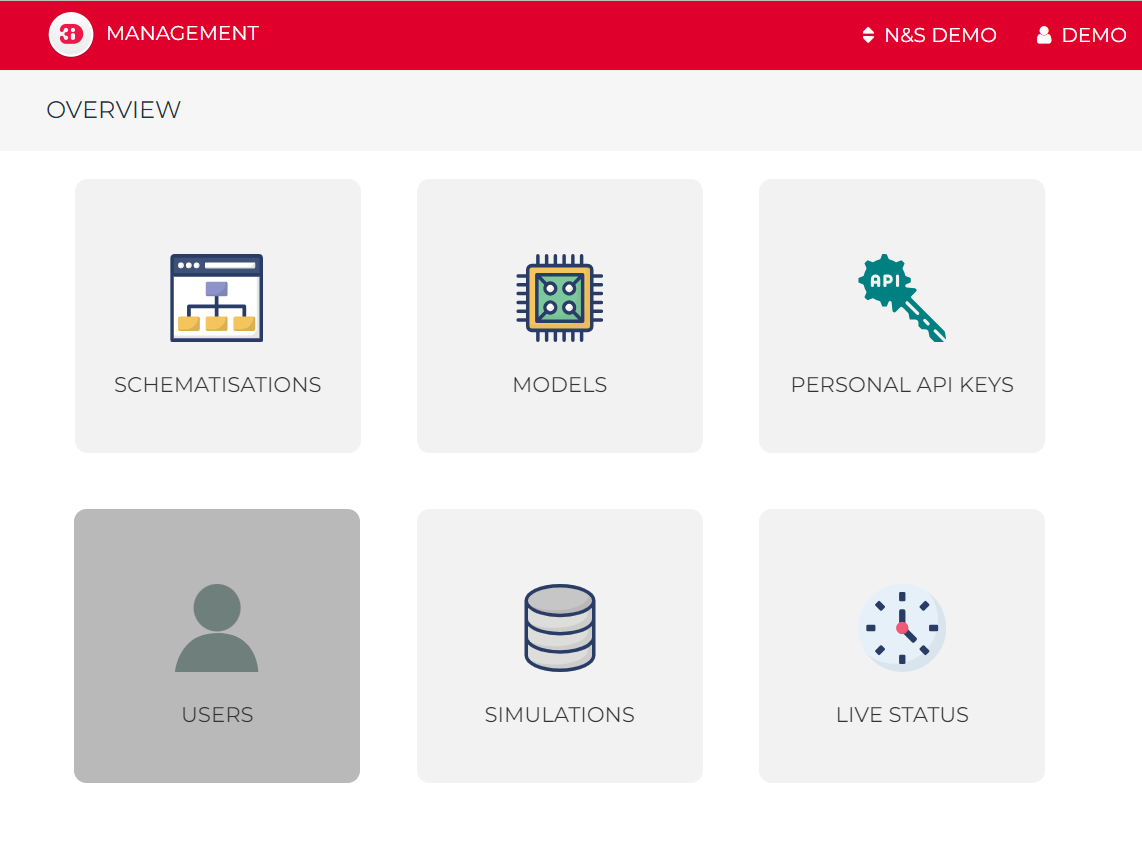
Fig. 24 The homepage of 3Di Management.
In the top right, you can change organisations if you have access to multiple organisations. You can log out by clicking <your user name> > Logout in the top right.
Schematisations list
If you click the Schematisations tile in the overview, you will see a list of all schematisations within your organization. This list of schematisations can be exported to an Excel file.
You can find a specific schematisation by searching its Name, Tag, or Creator using the search bar. Once you locate the desired schematisation, you can click on its name to open the detailed view.
Schematisation detail page
The schematisation detail page consists of the following sections:
Schematisation
Revision
3Di Model of this revision
Predefined simulation data (if applicable)
Schematisation
Describes the schematisation. In this section you can change the properties of the schematisation, such as the name, description, and tags. You can also transfer the schematisation to another organisation or delete the schematisation.
Revision
This section gives information on the selected revision. To view the properties of another revision of this schematisation, click Choose other revision. In this section you can download the SQLite file and rasters for this revision.
3Di Model of this revision
If a 3Di Model has been generated for this revision, this section shows the properties of the 3Di Model, such as model name, model size (nodes and line count), extent and location,
(Re-)generate 3Di Model
Under the heading Re-generate, you can see if the 3Di Model is still up to date, i.e. if it has been generated with the most recent 3Di framework version. If it says here that “The model is not up to date”, you may want to re-generate the 3Di Model. In most cases, this will not be necessary, but if there are any problems with this 3Di Model, please re-generate the 3Di model to see if this solves the issues.
To re-generate the 3Di model, click Re-generate this 3Di model.
Simulation templates
This table gives an overview of the simulation templates that are available for this 3Di model.
Predefined simulation data (if applicable)
This section shows initial (ground)water level rasters and saved states that are available for the selected 3Di model.
Models
When you click the Models tile in the overview, you will be presented with a list of all models associated with your organization.
These models can be visualized on the map within the map view. Furthermore, the list of models can be exported to an Excel file, which can prove useful if you intend to manage your 3Di models more efficiently.”
Personal API Key
When you click the Personal API Key tile in the overview, you will be presented with a list of all the Personal API keys associated with your organisation. You have the ability to Revoke keys that are no longer in use. If you need to generate a new Personal API Key, follow these steps:
Click +New Item.
Provide a name for the key.
Click Submit.
Once submitted, you can copy the generated key for your use.
Users
You only have access to this functionality if you have the Manager role.
In this screen, you can:
Inviting new users
If a new user needs access to 3Di from the organisation, this can be granted by the Manager from the Users section of 3Di Management.
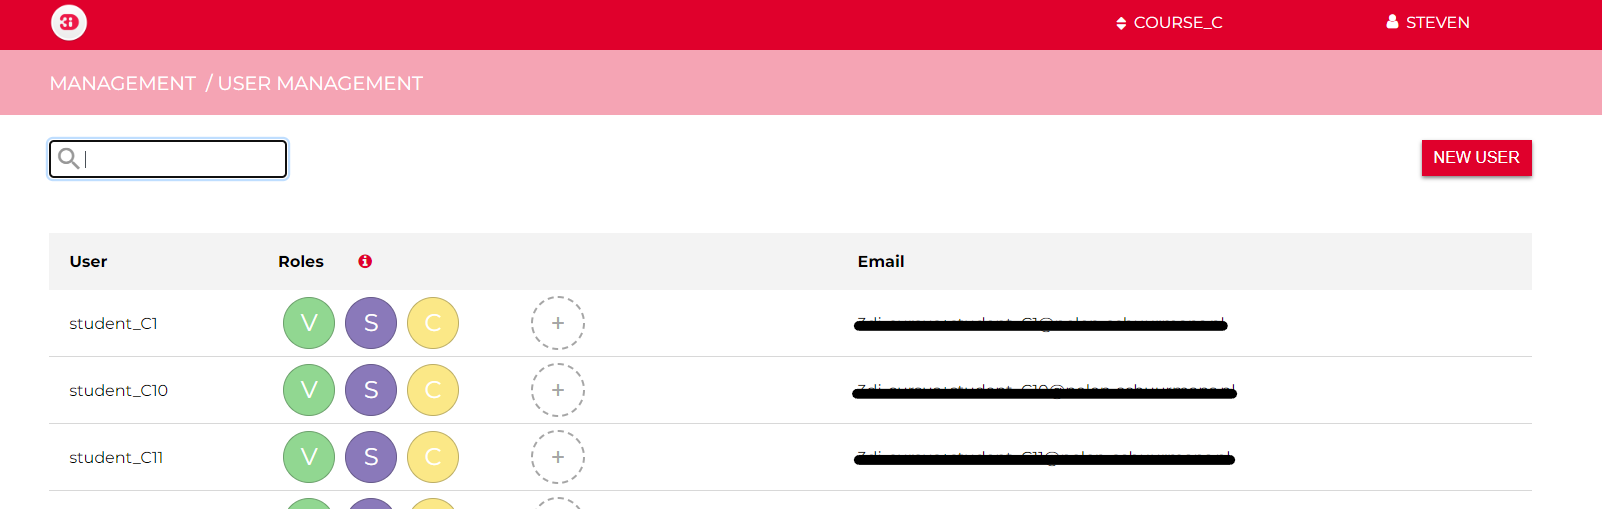
Fig. 25 The Users section of 3Di Management
Click + NEW USER at the top right of the screen.
Type the user’s email in the ‘email’ field

Fig. 26 The invitation screen for new users. You select the roles by clicking on them.
Select the roles the user will have (see User roles)
Click SAVE.
Success! The invitation has been sent and will be in the new user’s mailbox within 5 minutes. An existing user can use the invitation link to accept the invitation.
A new user can create an account by using the Signing up guide. When accepted, the user will appear in the User Management overview.
Tip
Clicking 🛈 will also show you an overview of the roles and the rights associated with them.
Tip
If the email does not appear in the inbox after 5 minutes, first check your spam folder. If the invitation is not there either, you can always contact the servicedesk.
Adjusting existing rights
In the User rights overview screen, you can manage the rights of existing users. Here you see the following information of users who have rights for your organisation:
Username
Roles
Email
By clicking on the plus sign next to the roles of a user, you can start adjusting the rights. The plus button will then change to SAVE. Once the rights are as desired, click SAVE to confirm.

Removing users
You can remove a user from your organisation by removing all the user’s roles. This will not delete the account of the user, but just revoke that user’s right to your organisation. If you want to entirely deactivate a user’s account, contact the Service desk.
You cannot revoke your own Manager role.
User roles
Each user is assigned one or more Roles, which give them the rights to perform certain sets of actions.
Viewer
As a viewer, you can read data from the API of the respective organisation, and you can follow simulations of others. These users cannot start or create simulations themselves.
Simulation runner
With this role, users can start simulations themselves with 3Di models provided by the organisation. This role always goes in combination with the Viewer role to ensure that the user can also follow the simulation.
Creator
Creator rights are needed to provide new schematisations and models to 3Di. Creators can also change or remove schematisations and 3Di models, and read data from the API. To run simulations, the Simulation runner role is necessary, also if you already have the Creator role.
Manager
Managers give and take roles from other users. A manager can also revoke the rights of another manager. So, make sure to only give manager role to trusted parties.
Tip
In some situations, organisations are created for specific projects. If the data within this project falls under your organisation and you want to appoint a manager for this, please contact the servicedesk.
Simulations
When you click the Simulations tile within the overview, you will be presented with a comprehensive list of all simulations associated with your organisation. This list provides insights into various aspects of the simulations:
Name: This denotes the name of the simulation.
Model: It reveals the name of the corresponding schematization.
User: This field displays the user responsible for initiating the simulation.
Status: Here, you can discern the simulation’s status (finished/crashed).
Type: This indicates the platform used for conducting the simulation (live/api).
Tags: Tags assigned to the simulation for categorization.
Started: The date when the simulation was initiated (dd/mm/yyyy).
Length: The duration of the simulation.
Project: The project to which the simulation is associated.
To locate a specific simulation, you can perform a search based on the Simulation name, Model name, or Username using the search bar. You also have the option to fine-tune your search using the checkboxes beneath the search bar:
Only show my own simulations: This filters the list to display simulations executed by you.
Only API simulations: This narrows down the list to show simulations executed through the Modeller Interface.
Only live site simulations: This displays simulations conducted via 3Di live.
Hide crashed simulations: This excludes simulations that experienced crashes.
Once you find the desired simulation, clicking on its Name will open an overview. Within this overview, you have the following capabilities:
Download the simulation results.
Navigate to the corresponding model for which the simulation was conducted.
View the initial conditions and events of the simulation.
Save the simulation as a template for future use.
Live status
When you click on the Live status tile in the overview, you will be presented with an overview containing the following information:
The current number of licenses being utilized by your organization.
The count of simulations that are currently queued.
The number of simulations that are actively running at the moment.
Simulations that have completed while you were browsing this page.