Authentication and user management
Signing up
New users require an invitation to create a 3Di account. Users with a ‘manager’ role within an organisation are able to send invitations. If you do not know whom to contact, please contact our Service desk at servicedesk@nelen-schuurmans.nl.
If you have received an email from either a manager within the organisation or the servicedesk:
Open the invitation link in the email.
Click on ‘Sign up’ and fill in the required fields. Please use the same email as the invitation was sent to. Using another email will not work.
Check your email for the required verification code.
You should now be redirected to the API root. This means you have created a 3Di account and have access to the organisation.
Note
If you see a 403 error after openining the invitation email, please try to open the url in an incognito window before reaching out to the Servicedesk.
Signing in
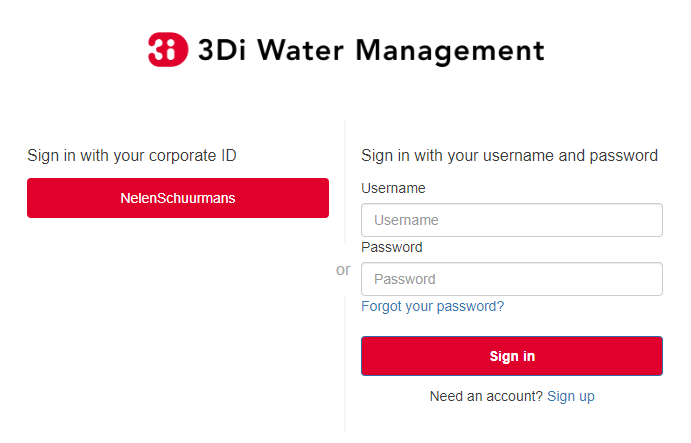
Users can login in either the Modeller Interface, 3Di Live, 3Di Management and the API. Except for the Modeller Interface, all 3Di components will redirect you to the following login screen:

Fig. 92 The login screen.
If you do not have an account yet, please read ‘Signing up’ first. If you do have an account, you can either log in by using your company account or by using your credentials, in case your company is listed on the left part of the login screen. Loging in via your company account is the preferred option. Existing users should use the same method as they used when signing in for the first time.
Warning
Due to our authentication update in May 2022 it might occur that you cannot log in anymore. Please use the ‘Signing up’ guide to create a new account.
Tip
Do you want to add your company to the list to centralise the user accounts of your organisation? Please contact our support office (servicedesk@nelen-schuurmans.nl) for the options.
User management: tasks of the Manager
Users rights are managed by the person(s) in your organisation that have the Manager role. As Manager, you manage your organisation’s 3Di account and its users. You grant or revoke rights for your organisation. A manager has two main tasks:
You can do this in the Users section of 3Di Management (management.3di.live).
Maintaining rights of existing users
The rights of users under your organisation do not expire automatically. So, it is important that you regularly check whether users still need their rights. This can include employees leaving the organisation or projects coming to an end. Sometimes, not all rights need to be revoked; it is also possible to revoke only specific rights. It is up to you to determine how often you want to perform this check.
Granting rights to new users
If a user needs rights for your organisation, you are responsible for granting them. For the smooth progress of a project, it is useful to handle such requests promptly. Granting rights does not have to be a lengthy task; rights can be granted in a minute. For instructions, see Inviting new users and Adjusting existing rights.
Tip
Use a bookmark to go directly to 3Di Management. This way, you can give a user rights in no time.
Ensure that rights are discussed and granted at the beginning of a project. This prevents delays later due to someone waiting for their rights.
Don’t forget to remove users’ rights after a project is completed. This way, you actively maintain the user database and keep your data under control.
Personal API Key
When you login via your browser, your browser receives a session cookie. All subsequent requests to the API are authenticated with that session cookie.
Authenticating to the REST API outside of a browser is done by attaching a
Personal API Key to every request. You can attach a Personal API Key to
a request by using HTTP Basic Authentication with password = {your api key}.
The username needs to be fixed to __key__ (with double underscores on both
sides of the word “key”).
Almost all applications or script languages support HTTP Basic Authentication.
Generate a Personal API key at https://management.3di.live/personal_api_keys. It is considered best practise to generate one Personal API Key per application or script, so that you can selectively revoke keys in case they are compromised.